

This week, I will look into pawn endgames with 3 vs. 2 on the same side. In order to navigate through the positions, we shall deal with important 2 vs. 1 positions too.
1. Positions with a+c versus c

In this and the next position, we shall consider positions where the a-pawn is on a6/a7. This makes a huge difference.
1.c6 Kc8
c5/c7 are mined squares, but White can lose a tempo around c5 by king triangulation, whereas this is not possible for Black around c7.
2.Kd4!
2.Kd6 Kd8 3.c7+? (White can still return to the winning plan with 3.Kd5) 3…Kc8 4.Kc6 is stalemate.
2…Kd8 3.Kc4! Kc8 4.Kd5! Kc7
Now 4…Kd8 loses in trivial fashion: 5.Kd6 Kc8 6.c7 Kb7 7.Kd7+–
5.Kc5+–

Black is to move now, and White will enter b6 and pick up the a6–pawn, easily winning.
5…Kc8 6.Kb6 Kb8 7.Kxa6 Kc7 8.Kb5+–
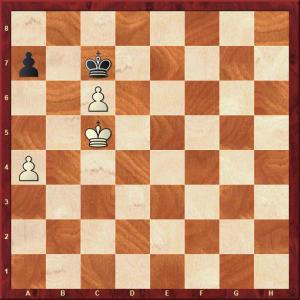
The evaluation changes if the pawn is on a7:

With the pawn on a7, the White king is not able to approach this pawn and pick it up as in the previous example. All Black has to do is to count the reserve tempos on the a-file at a critical moment.
1…Kd7 2.c6+ Kc7 3.Kc5
Depending on the reserve tempos on the a-file, the corresponding squares are either d6/d8 or d6/c8. This is the crucial moment in question.
3…Kc8!
With 2 reserve tempos on the a-file, the squares d6/d8 are mined in this position. Remember that Black cannot move the a7–pawn (and surrender the b6–square) – that is, not until White has moved the pawn from c6 to c7.
4.Kd6 Kd8 5.a5

5…Kc8!
If Black plays the horrible 5…a6?? White switches plan back to the king triangulation around the c5–square as we saw in the previous position: 6.Kd5 Kc8 7.Kc4 Kd8 8.Kd4 Kc8 9.Kd5+– Kc7 (Or 9…Kd8 10.Kd6+–) 10.Kc5+–
6.c7
6.a6 Kd8= (Please don’t fall for the following cheap trap that loses: 6…Kb8?? 7.Kd7 Ka8 8.Kd8!+– and mate in further 2 moves (8.c7?? Stalemate).
6…a6= 7.Kc6
Stalemate, ½–½.
Notice: it changes the verdict dramatically if Black’s pawn is on a6 or a7. This knowledge is useful when transforming a 3 vs. 2 position.
2. Positions with b+c versus b

White to move first can hand over the move to Black by means of a king triangulation:
1.Ke5!
1.c6+?? is only a draw, which will be clear later. It’s a common mistake in this position.
1…Kc6
Black is not able to enter the e-file: 1…Ke7?! 2.c6!+–
Because the e-file is off limit, Black has too little space to maneuver and White can always seize the opposition and push the Black king towards the a8-corner.
2.Kd4 Kd7 3.Kd5
The starting position with Black to move.
3…Kc8!
Black is setting up a trap, trying to lure White into pushing the c-pawn too soon.
4.Ke6!
4.c6?? Kb8!= 5.c7+ (5.Kd6 bxc6 6.Kxc6 Kc8=) 5…Kc8

This is a fortress. Whenever the White king approaches, the Black king will be stalemated.
Instead of 4.Ke6, 4.Kd6 also works – White should simply push the Black king towards the a8–corner.
4…Kd8 5.Kd6 Kc8 6.Ke7!
Again, not 6.c6?? Kb8=
6…Kb8 7.Kd7 Ka8

8.c6!
White sacrifices the c-pawn and mates the king in the corner.
8.Kc7?? is stalemate.
8…bxc6 9.Kc7 c5 10.b7+ Ka7 11.b8Q+ Ka6 12.Qb6#
1–0
In the next position, everything is moved back one rank:

White to move first is not able to win. The main reason is that the Black king can now use the e-file (as opposed to the previous position), and thus he can keep the opposition to White’s king.
1.Ke4 Ke6!
1…Kc5?? 2.Kd3 Kd6 3.Kd4+– Black is to move in the starting position, and this is fatal. 3…Ke6 4.c5 Kd7 5.c6+ and White wins as we shall see shortly.
2.Kf4 Kd6!
Because the c4–pawn covering the d5–square, Black is not able to keep the frontal opposition on f5–d5, but instead the threat of 3…Kc5 picking up the c4–pawn makes this (otherwise relevant) point meaningless. White now has to retreat.
3.Ke4
3.Kf5?? Kc5–+
3…Ke6 4.Ke3 Ke7=
Or 4…Kd7=
½-½
If Black moves first in the starting position, White is winning:
1…Ke6
Backward king moves allow the White king to approach and pick up the b6-pawn from the side.
2.c5! Kd7
2…bxc5+ 3.Kxc5+–
3.c6+ Kc7
This is winning for White, but only by sacrificing the c-pawn.
4.Kd5 Kc8 5.Kd6 Kd8 6.c7+ Kc8

7.Ke7!
Of course not 7.Kc6?? stalemate.
7…Kxc7 8.Ke6
White simply approaches and picks up the b6-pawn now:
8…Kc8 9.Kd6 Kb7 10.Kd7 Kb8 11.Kc6 Ka7 12.Kc7+-
King on the 6th rank in front of the pawn is always winning – except for a rook’s pawn.
3. Positions with 3 versus 2
Here are 3 exercises for next week’s Endgame Column:


In these 2 positions, use the knowledge from this blog post to make the right decision. Consider these 3 options in both positions:
- Push the f-pawn: does it win?
- Push the g-pawn: does it win?
- Push the h-pawn: does it win?
In the 3rd exercise, choose how you want to proceed with White in order to win the game.

Enjoy!
![]()